Search This Blog

Tuesday, 9 April 2024

TDF Rly Home

Welcome to Tumble Down Falls Railway (TDF Rly), the blog for my Garden Railway, and the activities that make it work, if you may wish to read its "Back Story".

In The Beginning

As with most us older railway modellers, I have been building layouts in lots of scales over many years.  starting as a young boy with Hornby 0 Gauge Tin Plate, and then some years late the 00 gauge “train set” for my son, which started my interest in model railways.

The 00 gauge layout led to N Gauge, in a bid to have more running in a small space, then a move of house, more space and back to 00, though eventually “fat fingers” so a change to 0 gauge.  As nice as this scale was, and I was able to build both locos and wagons (from kits), and a bit of “bashing”, the limitation on room meant I was still not content, and needed something else.

April 2024 Update

 It has been a couple of months since the last update, so what has happened around Tumble Down Falls.

During March I had a couple of trains out, the Stainz and PM 4010, and although the Stainz ran well, the PM 4010, would insist on derailing on one particular curve, and in one direction.  The issue with the curve is, it is on a gradient, and require some very minor superelevation, which is achieved by adding ballast under the outer rail, in this instance by trial and error:


With the ballast loosley in place test runs were carried, with of course open cab test crews to ensure full visability.

I also carried on the Boot Lane Nancy build, and work progressed in painting and Loco Remote Amberley Brush:

The photos show the finished colour with the Clavey driver in place.

This loco has a simple on/off switch, and the battery is removed from the loco to charge it


Monday, 29 January 2024

January 2024 Update

 2023 has been a very busy year, and the blog has been left behind, with very little work taking place on the railway.  However to start 2024 I am building a Boot Lane Nancy in SM-32 the page will grow as the build continues.  I am also build a Loco Remote Amberley Brush, however the instruction and photos provided are so good that I am not providing a separate page for it.  The little engine went together very quickly and this is what I now have:

As this little loco progress I will keep you informed.


Saturday, 18 March 2023

March 2023 - Update

 The warmer weather is on its way, and soon, it will be time to get out in the garden.  For me a patio to relay prior to my railway extension, but more of this when work begins.  My Bachmann Railtruck is now complete, and a test drive was completed and it is running well, and now I am in the process of converting a Bachmann Baldwin 2-4-2 Americanized "Lyn" ( part # 91199) to battery remote control, and removing the Americanized items, this  the item as bought:

  
To follow my progress the blog on the conversion is Bachmann Baldwin-2-4-2 Lyn


Friday, 13 January 2023

January 2023 Update

 A lot has happened in my life since the last update, though very little has any thing to do with the Garden Railway, hence the first update in four months.

I did have an aviary (or two) birds have gone, however this allowed for the conversion of one of the aviaries to the "Waiting Room":

 
This allows for the storage of my locos and other rolling stock.
 
My indoor work space was transformed, with a new workbench made from a solid beech worktop, and again storage was rationalised:


Finally I have finished the Bachmann RailTruck conversion as mentioned in my last update and can be found in my blog at Bachmann Railtruck.

Hopefully my next update will not be spread so far apart 😊.


Thursday, 8 September 2022

September 2022 Update

 It has been a few months since the last update, the warm summer has meant that not much work has been carried out inside, However a few trains have been run:


Also the purchase of a Bachmann Rail Truck, this will become a winter battery conversion project, and as such I will document the progress on here:

And finally, work has continued on my OcCre Streetcar finishing and fitting the new bogies, please see that page for further details

Tuesday, 12 April 2022

April 2022 Update

 So, quite a lot has happened over the last couple of months,  The San Francisco Streetcar has progress to powering up and some initial test runs.  The warm weather allowed me time to get out and fix and wire in the the Kippo Signal Box.  Then there was the surprise event, which started with the purchase of an LGB Steeplecab, and the subsequent radio control battery conversion.

And then there is the ad hoc playing testing in the sun:


Monday, 28 February 2022

February 2022 Update

 Work has been progress on my OcCre San Francisco Streetcar and the blog on that will be updated accordingly.  I did find that I was missing one of the filigree corner pieces,  and decided that I would cast my own, and used this as an opportunity to have a little trial:

These are my results from my trial.  First the material used for moulds and castings, the numbers refer to each item in the photo, and my conclusion below the photo:

  1. This is the Blue Stuff mould.
  2. This is a 2 part silicon mould.
  3. One of the original white-metal items used as a pattern.
  4. A 2 part resin cast made using the silicon mould.
  5. Two 2 part resin casts cleaned up.
  6. Green Stuff cast using Blue Stuff mould.
  7. Milliput cast using Blue Stuff mould.
  8. 2 part resin cast using Blue Stuff mould.

The silicon mould [2] could be removed from the pattern after about 1 hour, however the instructions suggest waiting at least 24 hour before use to fully cure. As suspected it had a number of small air bubbles, however due to the fineness of the item being cast cleaning the excess from the cast was impractical though not clearly seen in the block [4], though some casts [5] from the silicon mould were acceptable. Both Green Stuff and Milliput cast were attempted from the silicon mould, but due to the flexibility of the mould I could not get a casting from either.
The Blue Stuff mould [1] was made, following the instructions, heating for 1 minute and ready for immediate moulding, the mould can be used as soon at it reaches room temperature. My first attempt was very poor, however due to it re-usability, a second attempt took place taking note of the reasons for the first failure, which was not using small enough pieces initially to form around the mould, also just before the mould was ready, I re-immersed it in hot water to complete the moulding.
Using the Blue Stuff mould I cast first with Green Stuff [6] and after rolling out thin it took to the mould, was de-moulded after about 3 hours, and took 24 hours to harden, though it still retains some minor flexibility.
Again, using the Blue Stuff mould I cast with the Milliput [7], applying it similarly as I did with Green Stuff, this was far more sticky to handle. De-moulded again after about 3 hours, still not fully hardened, with hardening taking well over 12 hours.
My last cast with the Blue Stuff mould was the 2-part resin [8] hard enough to de-mould in less than 1 hour, and hardened by 3 hours (this will depend on the resin you use).
Conclusion:
  • Silicon is normally a good mould agent with 2 part resin, though it takes time to cure, and develop air bubbles and though the mould can be reused a number of times, you cannot make a new mould with it, recommend that a release agent is used.
  • Blue Stuff, good for one off casts due to being reusable, quick from making the pattern to casting the mould, after a few uses it does start to deform.
  • 2 part resin, generally good, and will flow in to most areas, though can be very brittle, and fine items can snap.
  • Green Stuff needs to be worked in to the mould and not suited for silicon moulds of other flexible moulds, never fully hardens.
  • Milliput as above needs to be worked in to the mould and not suited for silicon moulds of other flexible moulds, but does harden, could be come brittle, though with a long working time most flash could be removed before fully hardened.
I think all of these have a place in moulding and casting, but you need to ensure the correct combination.

Tuesday, 4 January 2022

January 2022 Update

 First post of 2022, and the holiday season break has seen me busy.  I have completed my Timpdon 2 Compartment Coach and Generator Wagon, and my Kippo Signal Box to hide the "Temple Yard" turnout switches has been started and almost completed, details to follow.  My other big project is an OcCre San Francisco Streetcar, only just started, and currently trying to work out how to motorize it, again the blog will be updated as this progresses.

Monday, 18 October 2021

October 2021 Update

 A few tasks done this month:

  • The Bachmann 10-wheeler was upgraded to a 4S Li-Ion with a new Rx and ESC, details on the 10-Wheeler page
  • The Points (switches) had their power and control reviewed, more details further down the page.
  • A Bachmann Tram has had work started to convert it to battery power, a new page with details will follow.
  • A Timpdon 2 compartment coach has been started, again a new page will be created to provide details.
  • Finally a Pola "Garden Shed" is under construction updates and photos will follow.

Point Control

Power supply and control units within the garage
Junction box with outgoing power
Conduit from garage to railway
Junction box with connections to points
Photo 1

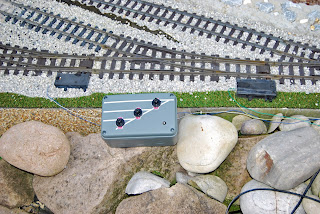
The point control to the "shed" area is slightly different. It was considered that any manoeuvring in that area would mean you would be closes by, so I decided to run 18 VDC to an IP66 control box, fitted with DPDT Centre off none latching switches to power the point motors. The unit has bee tested and works, however permanent installation will wait until I have constructed a building (Kippo Signal Box) to protect the junction box.

Thursday, 30 September 2021

September 2021 Update

It has been a while since I have updated my blog with the railway activity, so what has happened over the last few months.

  • The extension has had a reverse loop added  more details of that will in Extension "Phase 2" page.
  • The remote operation of the points (switches) motors has been transferred use with a Precision RC Train Engineer Revolution, affectionately know as a Revo, I will provide more details further down this page.
  • All track power has now been removed, along with isolation tracks and point motor supplementary switches. 
  • Wyvern Halt has new station signs mounted in a flower bed with "street" lights:


  • Planning is currently happening for a further extension, though sill in the very early stages, again see further down this page. 
  • To enable better operations, I now wish for the loco to "run around" the train in Wyvern Halt Station, and to enable this to happen the loco need to be uncoupled from the train.  As the train runs "double hooked" two uncoupling ramps are required.  Initially I tried with two "passive" ramps, however the loco/train would uncouple every time, so my next endeavour is to try one electrically operated (on order) and one passive ramp:


  • The railway has now gained its own cat:

Revolution 

When the railway was track powered this was remotely controlled by a Crest Train Engineer (TE), and via an auxiliary receiver,  when the track power was removed all the TE equipment went.

I looked around for various methods to control the points, but already having standard G Gauge point motors I was loath to move to a totally different system.  Luck would have it that I was offered a Precision RC Train Engineer Revolution (Revo) transmitter free, so all I would need would be the Revo "Track Switch Control Rx".  Fine Scale Brass were identified as the UK agent and a unit was ordered.

The unit comes as a bare unit with no casing as shown below, so a project box was obtained and the unit fitted inside.

Set up isn't difficult, however my lack of familiarity with the system did mean if took a couple of attempts to link (bind) the Tx and Rx, however once linked the system works so well a second Rx has now been ordered.

Wednesday, 21 April 2021

April 2021 Update

The weather has been kind and some work has progressed on the railway out side, mainly the final finishing touches to the stream. Some small pebbles bedded in to the bank and damp sand pressed in the damp cement. Obviously a train must be run, so a good photo opportunity

Work finishing the IP Engineering Railbus has been slow, all the electronics have arrived, but there are some issues, so completion of the motorisation is in abeyance. Final finish to the exterior is awaiting decal, they have been on order some weeks, and not arrived yet. It would seem there will be a flurry of work on this as everything is bound to arrive at the same time.

Saturday, 6 March 2021

March 2021 Update

It has been a few months since my last up update, not a lot has happened, though we have been through the festive period.

Looking for a new project I have bought an IP Engineering Colonial Railbus, I will add a new page and document the progress of the build, and detail specifically where I have diverted from the standard building instructions.

Sunday, 29 November 2020

November 2020 Update

November already, and what has been done since the last update. The first thing to mention is the Model Town Engine Shed, as this is just a standard build of a resin building it will just get a mention in the blog, and will not have its own dedicated page. 

Work has also continued on the 10-Wheeler, both the tender and loco body having been painted and the detailing work has now begun, please see Bachmann 10-Wheeler Battery Conversion page for the details of the work so far. 

Model Town Engine Shed 

I found this kit to be one of the earlier ones produced by the company, and a little extra effort was required, however its completion was very satisfying. 

It will eventually have a plinth in the siding😊

Sunday, 4 October 2020

October 2020 Update

So here we are at the beginning of October and the whether is awful, so what has happened since my last update:

  • The big one is permission for phase two of the railway, an extension to run down the garden and around the arbour seat.  However due to the poor whether, nothing has really started, but I have a dedicated page for the work The Extension, Phase Two which will be updated as plans and work develops.
  • The second piece of activity is the starting on my Bachmann 10-Wheeler conversion to RC battery, again I have a dedicated page for the conversion Bachmann 10-Wheeler Battery Conversion and again I should be able to update the page as activity happens.  To see the current progress click the link to see what I have done so far.
As we move to this more inclement whether I will hopefully be starting other new projects that can be completed indoor – thanks for reading 😀

Friday, 11 September 2020

September 2020 Update

Since my last blog entry two activities have taken place:

  • The new page on my Trailing Power Wagon, building took place a while ago, and the addition of this page just help complete my backlog of work to bring the site fully up to date.
  • The Water Feature has been upgraded, with a new pump and a redesign of the sump area.  The page will be updated as soon as the weather is good enough to get some photos.

Very little else has taken place other than to continuous weeding, even with weed suppressant membrane  under the track the weed still keep appearing, it's all part of the fun running a GARDEN railway.

Tuesday, 11 August 2020

August 2020 update

 It has been a few weeks since the last update, so what has been happening on TDF

The transitions from the bridges have arrived and installed, and currently I am looking at the landscape around the bridges to blend them in, hopefully this will be finished by the end of the months and photos with an update to the Water Feature page will follow. 

I also decided that I needed (or should that be wanted) a wagon to carry a camera around the circuit and take video footage, a few trials have been carried out and the wagon is nearing completion.  A new page will be added that takes the reader through my trials and tribulations of the wagon design and the camera itself. 

Lastly for this update, I have two Bachmann Jackson Sharpe coaches, one already updated and painted burgundy, the second in the process of painting and updating, I also have a Bachmann Caboose, and the work to paint and update this has been carried out in parallel with the coach as a lot of the work is similar.  when finish photos again will follow.

Friday, 19 June 2020

June 2020 Update

I appreciate I blog should track the progress through the subject, but as I started my Railway over two years before I started the Blog, my previous activities need to catch up to make sense of any current post.  Over the last couple of weeks I have been updating my page on building my Water Feature, but more work is still required on that page.  I have also decided that my Railway Build Phase 1 page is missing details on how I fixed my track down/to each other, again this is on-going work.

This week though, I did manage some work on ancillaries for my Railway in the shape of building a Loco Servicing Caddy for my Steam Locomotive.  I will provide further details when I catch up, but it is based on Gareth Jones’ caddy shown is 16mm Today (SMT) 175, photos below.

Saturday, 18 April 2020

April 2020 Update

So today I added my first article, the conversion of a LGB Stainz to battery power remote control with Li-Po batteries and Deltang RC equipment.

Friday, 17 April 2020

Blog Theme

It’s a couple of weeks since I started this blog, the good weather, and trying to decide which theme to use has stalled any progress, but today I think I have a theme that works.  The story continues!